1. namespace简介
namespace是Linux提供的一种内核级别环境隔离的方法,很多编程语言也有namespace这样的功能,例如C++,Java等。编程语言的namespace是为了解决项目中能够在不同的命名空间里使用相同的函数名或者类名。而Linux的namespace也是为了实现资源能够在不同的命名空间里有相同的名称,比如在A命名空间有个pid为1的进程,而在B命名空间中也可以有一个pid为1的进程。
有了namespace就可以实现基本的容器功能,著名的Docker就是使用了namespace来实现资源隔离。
Linux支持多种资源的namespace:
| Type | Parameter | Linux Version |
|---|---|---|
| Mount namespaces | CLONE_NEWNS | 2.4.19 |
| UTS namespaces | CLONE_NEWUTS | 2.6.19 |
| IPC namespaces | CLONE_NEWIPC | 2.6.19 |
| PID namespaces | CLONE_NEWPID | 2.6.24 |
| Network namespaces | CLONE_NEWNET | 2.6.24 |
| User namespaces | CLONE_NEWUSER | 2.6.23 |
| Cgroup namespaces | CLONE_NEWCGROUP | 4.6 |
| Time namespaces | CLONE_NEWTIME | 4.11 |
在执行clone()系统调用时,传入以上的不同类型的参数就可以实现复制不同类型的namespace。比如传入CLONE_NEWPID参数时,就是复制pid命名空间。在新的pid命名空间里可以使用与其他pid命名空间相同的pid。
2. PID namespace
Linux内核使用struct nsproxy来对除user namespace之外的命名空间进行管理,struct task_struct.nsproxy指向当前进程使用的命名空间。如果两个进程共享除user namespace外的其他命名空间,那么他们共享一个nsproxy。
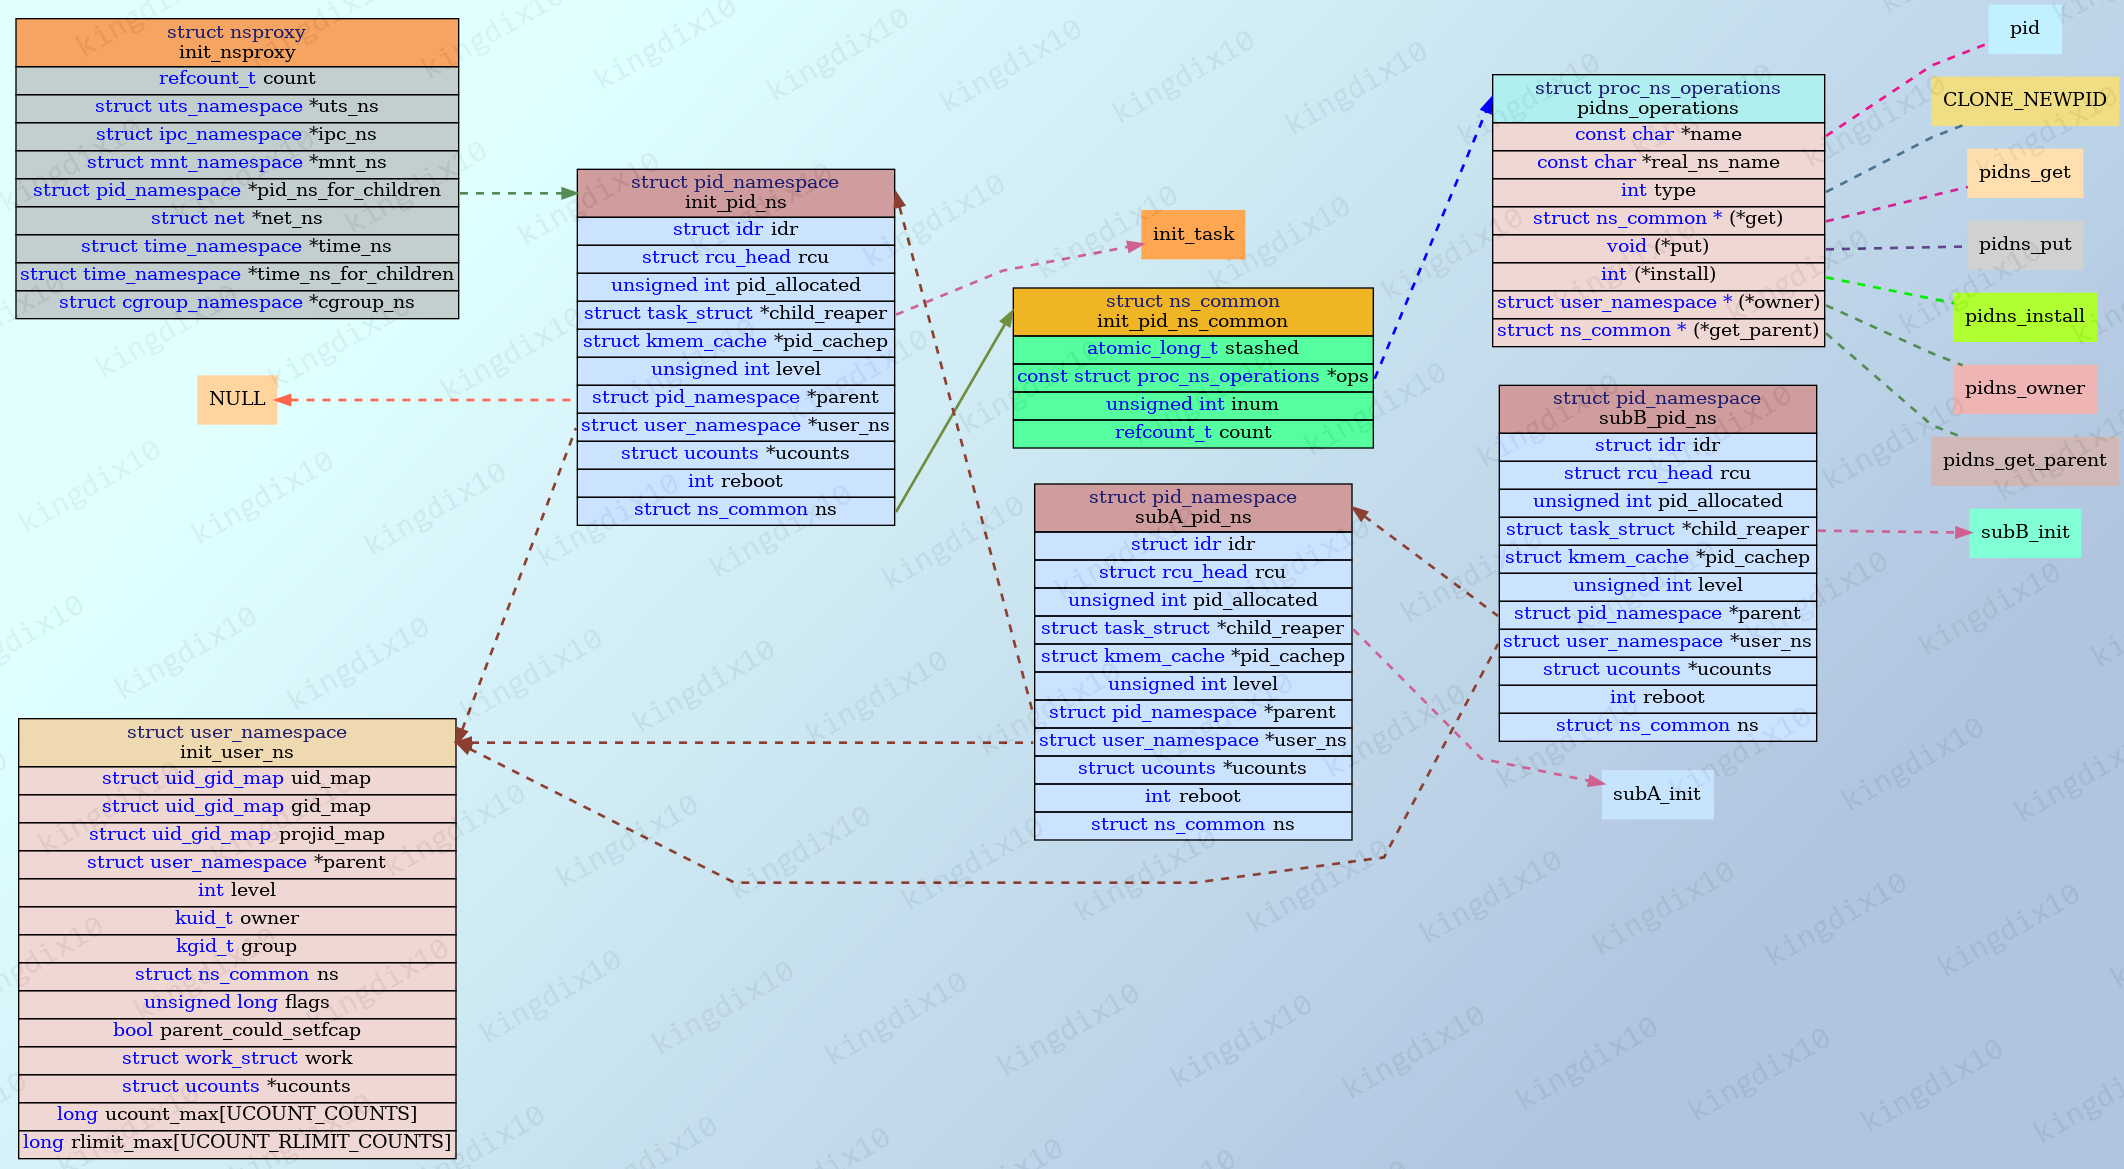
pid namespace按层次关系形成树状结构,初始pid命名空间为init_pid_ns。默认情况下,新创建的进程/线程都属于这个命名空间。子pid namespace的级别不是无限的,当前MAX_PID_NS_LEVEL被定义为32。

每个命名空间的1号进程,是这个命名空间的child_reaper,用来作为托管进程,回收当前命名空间中的孤儿进程。上图中,user_init是init_pid_ns的child_reaper,subA_init是pidnsA的child_reaper,subB_init是pidnsB的child_reaper。
上图对应内核的结构体如下,图中展示的是没有创建新的user namespace的情况。所有pid namespace的ops都指向pid_ns_ops。

pid namespace用来隔离进程号,每个pid namespace内独立分配进程号。上图中,pidnsB是pidnsA的子命名空间,pidnsA是init_pid_ns的子命名空间。对于pidnsB内的task1,其在pidnsB的进程号是2,在pidnsA的进程号是4,在init_pid_ns的进程号是6。
创建进程时,内核会在当前命名空间逐级向上查找父命名空间,直到找到init_pid_ns,在进程所属的所有pid namespace内分配唯一的进程号。在Linux内核中,这一过程是通过alloc_pid函数实现的。一个进程在不同的pid namespace中的pid,是通过struct pid的numbers数组来描述的。
 1/// include/linux/pid.h
 2struct upid {
 3    int nr;                     /// 当前level的pid namespace中的进程id
 4    struct pid_namespace *ns;   /// 所属的pid namespace
 5};
 6
 7struct pid
 8{
 9    refcount_t count;
10    unsigned int level;
11    spinlock_t lock;
12    /* lists of tasks that use this pid */
13    struct hlist_head tasks[PIDTYPE_MAX];
14    struct hlist_head inodes;
15    /* wait queue for pidfd notifications */
16    wait_queue_head_t wait_pidfd;
17    struct rcu_head rcu;
18    /// 在create_pid_cachep中创建kmem_cache时,根据pid namespace的level确定数组大小
19    struct upid numbers[];
20};
3. 查看命名空间
3.1. 使用ps查看
1# 需要用root权限,可以使用sudo
2ps -eo pid,pidns,user,group,cmd
输出结果如下:
1    PID      PIDNS USER     GROUP    CMD
2      1 4026531836 root     root     /sbin/init
3      2 4026531836 root     root     [kthreadd]
4      3 4026531836 root     root     [rcu_gp]
5      4 4026531836 root     root     [rcu_par_gp]
3.2. /proc//ns文件
1ls -l /proc/1/ns/
输出结果如下:
 1lrwxrwxrwx 1 root root 0 Jan 17 23:01 cgroup -> 'cgroup:[4026531835]'
 2lrwxrwxrwx 1 root root 0 Jan 17 23:01 ipc -> 'ipc:[4026531839]'
 3lrwxrwxrwx 1 root root 0 Jan 17 23:01 mnt -> 'mnt:[4026531841]'
 4lrwxrwxrwx 1 root root 0 Jan 17 23:01 net -> 'net:[4026531840]'
 5lrwxrwxrwx 1 root root 0 Jan 17 23:01 pid -> 'pid:[4026531836]'
 6lrwxrwxrwx 1 root root 0 Jan 17 00:25 pid_for_children -> 'pid:[4026531836]'
 7lrwxrwxrwx 1 root root 0 Jan 17 23:01 time -> 'time:[4026531834]'
 8lrwxrwxrwx 1 root root 0 Jan 17 00:25 time_for_children -> 'time:[4026531834]'
 9lrwxrwxrwx 1 root root 0 Jan 17 23:01 user -> 'user:[4026531837]'
10lrwxrwxrwx 1 root root 0 Jan 17 23:01 uts -> 'uts:[4026531838]'


